Two Single Channel Transmitters Remote Control Two Relays on One Receiver

Question from customer:

I need a 2 channel receiver with 2 remotes 1 channel. One remote control activates the channel A receiver on the receiver and another remote to turn on the channel B on the receiver. Is it possible with the CWB-1 model? And which receiver would like to recommend?

Answer:

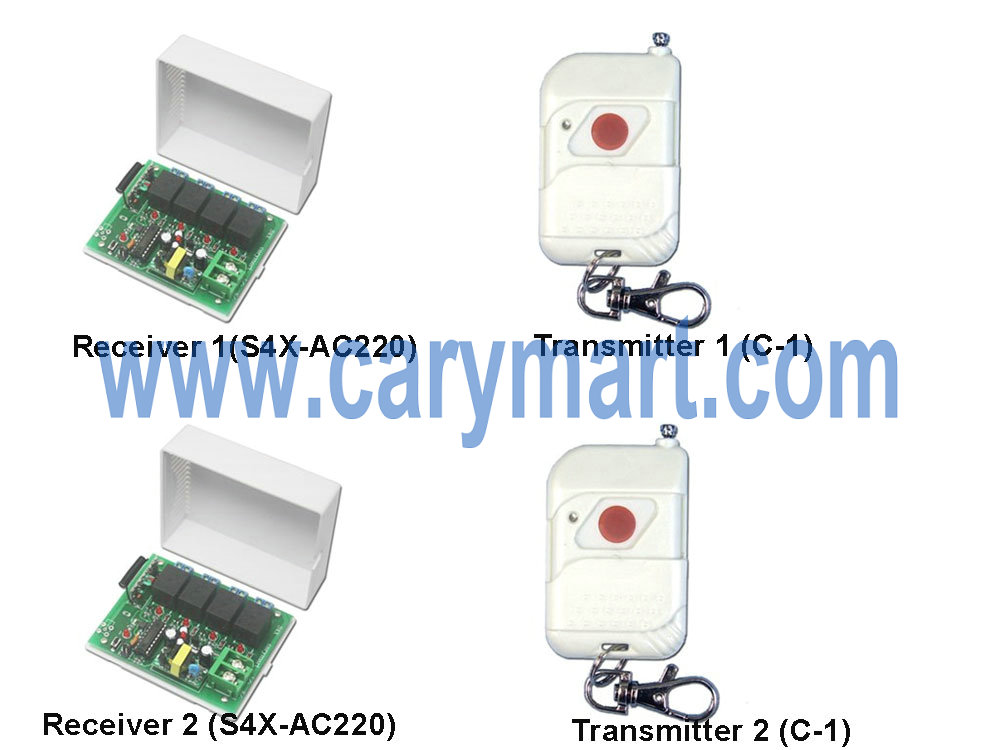
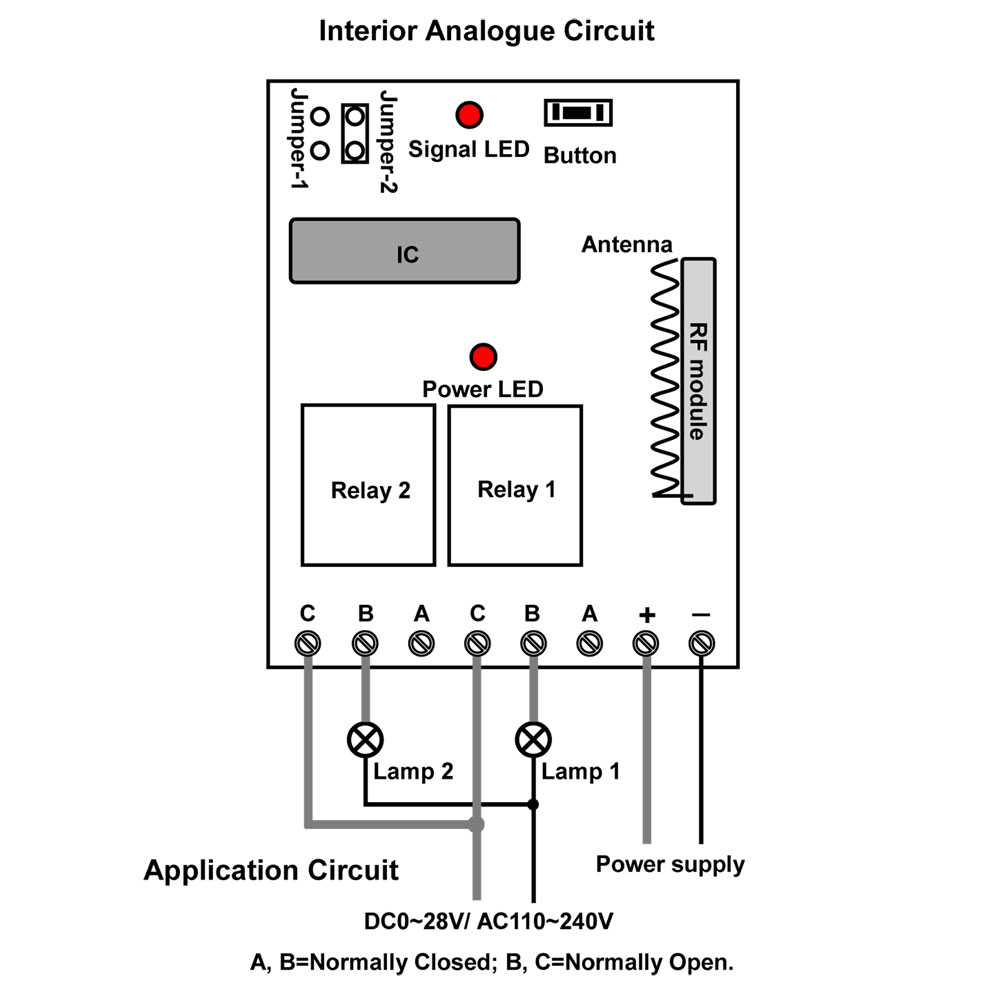
We recommend 2 channel 12V multi-mode receiver (S2U-DC12) and two waterproof wireless 50m remotes (CWB-1). We set configured code for them so that they can work together. The receiver is 12V activated and has two relays. When it works with that transmitter, its transmission distance can reach 50m in the open air. There is only one button on each transmitter.

It can control lights, motors, fans, electrically operated doors / locks / windows / blinds / cars or other appliances with AC110~240V or DC0~28V. You can turn on/off the receiver with transmitter (remote control) from any place within a reliable distance; the wireless RF signal can pass through walls, floors, doors and other obstacles.

remote-controller_1

We will take a dc lamp wiring method as an example.

A,B terminals is normally closed. B,C terminals is normally open.

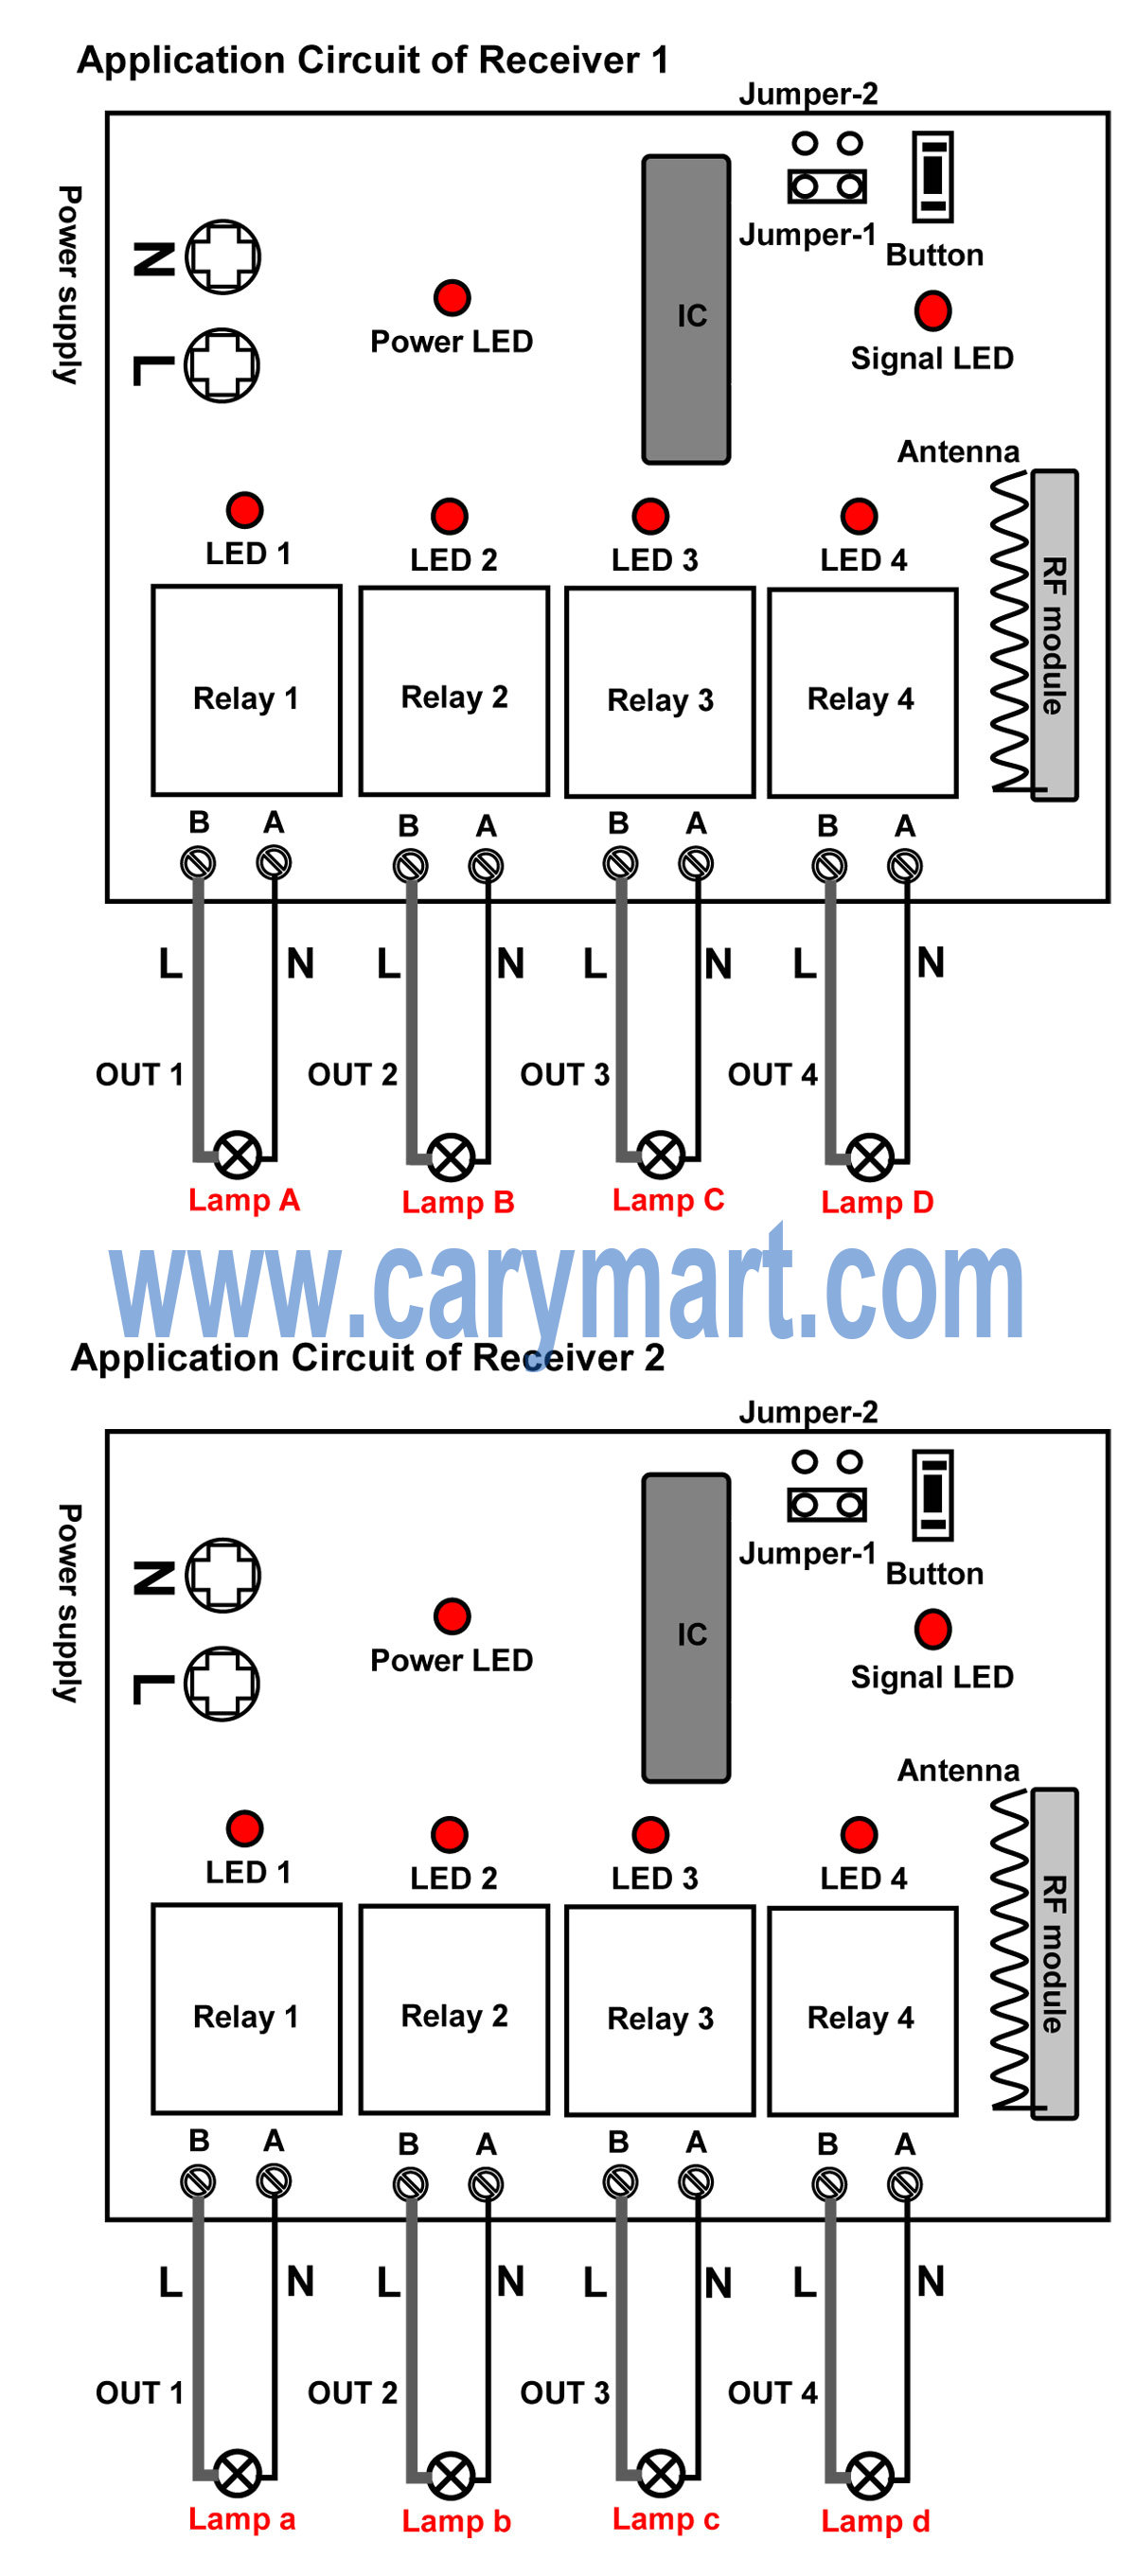
Wire two lamps to B&C terminals of each relay. Do as following picture shown.

receiver

Usage:

Setting control mode Toggle: Only connect Jumper-2.

Press the first remote -> lamp 1 is On; Press the first remote again -> lamp 1 is Off.

Press the second remote -> lamp 2 is On; Press the second remote again -> lamp 2 is Off.


Setting control mode Momentary: Only connect Jumper-1.

Press and hold the first remote -> lamp 1 is On; Release the first remote -> lamp 1 is Off.

Press and hold the second remote -> lamp 2 is On; Release the second remote -> lamp 2 is Off.


Setting control mode Latched: Disconnect Jumper-1 and Jumper-2.

Press -> On, another relay Off; Press another button -> Off.


Setting control mode Momentary + Toggle: Connect Jumper-1 and Jumper-2.

Control mode Momentary (Channel 1): Press -> On; Press again -> Off.

Control mode Toggle (Channel 2): Press and hold -> On; Release -> Off.

How to Remote Control 8 Lights with 2 Remote Transmitters

Overview:

“I am trying to set up a system with two 4-channel AC receivers and two remotes. What I’d like to do is have 4 lights hooked up to each receiver: (A,B,C,D,) on one receiver and (a,b,c,d) on the second. I would like Remote 1 to turn on/off lights A and a at the same time and lights B and b at the same time. I would like remote 2 to turn on/off lights C and c at the same time and D and d at the same time.”

Solution:

Yes, we recommend two AC power output 4 channel remote receivers (S4X-AC220) and two single-button transmitters (C-1) and set them to work according to your request.

For the receivers, they work at AC 110V/220V. Lights can be wired to relay output terminals and do not need supply additional power. For the remotes, C-1 has only one button. You can set toggle mode. (Press button, turn on device; press button again, turn off device)

remote-control-kits

Wiring is as the following picture shown.

circuit

When you press the button on the remote 1, it will turn on four lights A and a, B and b at the same time.

When you press the button on the remote 1 again, it will turn off four lights A and a, B and b at the same time.

When you press the button on the remote 2, it will turn on four lights C and c, D and d at the same time.

When you press the button on the remote 2 again, it will turn off four lights C and c, D and d at the same time.

4 Channel 12VDC Remote Control Kit for Lights

Question from customer:

I need a four channel receiver and transmitter to control lights or LEDs at 300 meters, 12 volt DC power. Do you have a system? Please respond as soon as possible. Large quantities are possible if we can find the right controlling system.

Answer:

4 channel 12VDC Power Output Switch Kit (S4X-DC12-ANT2&CB-4L) is your better choice. 4 lights or LED lamps can be wired to its channels. And 4 lamps can get power directly from the powered receiver. It is very convenient to you because you don’t have to supply additional power to lights. 2000m can be reached in the open field with the external extend magnetic antenna. Besides controlling lights, it can be applied to many fields, such as motors, fans, electrically operated doors / locks / windows / blinds / cars or other appliances.

1

Here is the wiring diagram. It is simple to wire lights. Wire four lights to A&B terminals from relay 1 to relay 4. Supply 12VDC to the receiver.

1_06

There are four working modes in this kit. They are toggle, momentary, latched, momentary + toggle modes.

Setting different control modes

•1) Setting control mode Toggle: Only connect Jumper-2.

Press button A: Turn on the relay 1, terminal OUT 1 (A&B) outputs DC power.

Press button A again: Turn off the relay 1, terminal OUT 1 no output.

Press button B: Turn on the relay 2, terminal OUT 2 (A&B) outputs DC power.

Press button B again: Turn off the relay 2, terminal OUT 2 no output.

……

•2) Setting control mode Momentary: Only connect Jumper-1.

Press and hold button A: Turn on the relay 1, terminal OUT 1 (A&B) outputs DC power.

Release button A: Turn off the relay 1, terminal OUT 1 no output.

Press and hold button B: Turn on the relay 2, terminal OUT 2 (A&B) outputs DC power.

Release button B: Turn off the relay 2, terminal OUT 2 no output.

……

•3) Setting control mode Latched: Do not connect Jumper-1 and Jumper-2.

Press button A: Turn on the relay 1, terminal OUT 1 (A&B) outputs DC power.

Turn off the relay 2, terminal OUT 2 no output.

Press button B: Turn on the relay 2, terminal OUT 2 (A&B) outputs DC power.

Turn off the relay 1, terminal OUT 1 no output.

……

•4) Setting control mode Momentary (Channel 1~2) + Toggle (Channel 3~4): Connect Jumper-1 and Jumper-2.

Universal Latched Remote Controller for 6V LED Light

One customer said he would like to install 6V led lamp into the trunk of his car and wants to control it by remote controller. He is wondering if it can come true because he wants to use LED lamp to illuminate with use of 6V battery.

We recommend him 1 channel 6V latched remote control kit (S1L-DC06+C-2).

1copy

This kind of remote control kit is activated by 6V power supply. So he doesn’t have to supply additional power for led lamp because led lamp will get power from powered receiver as long as you wire lamp to the receiver. With latched mode, he can press button 1 of transmitter to turn on led lamp and press button 2 of transmitter to turn off led lamp. If he wants to set on / off function respectively, it is better choice. It has normally open and closed contact. It controls various lights, fans or motors with voltage AC110~240V or DC0~28V. Of course, if he wants to remote control alternate current device, he needs to do some different wiring from direct current device.

Here is the wiring procedure of 6V led lamp which shares the same battery with receiver. The red wire from the lamp is connected to the C terminal of the receiver and black wire from the lamp is connected to the negative electrode of the power supply. The positive wire of the supply power is connected to B terminal and positive electrode of the receiver. The negative electrode of the power supply of power supply and receiver are connected together.

circuit

When he presses the button1, turn on the led lamp; when he presses the button 2, turn off the led lamp.

100M Remote Control LED Lamp

Question from customer:

I want to put a 220v Transceiver to turn on / off the power of a transformer of led lighting (to avoid the transformer is always on), this will make me a remote control switch. I want a basic on / off function product.

Answer:

1 channel ac power direct output remote switch (S1X-AC220+C-2) is suitable for you. Its remarkable feature is ac power direct output, that is to say, you don’t have to supply additional power to being controlled device because it can get power from powered receiver. It controls lights, motors, fans, electrically operated doors/locks/windows/blinds/cars or other appliances with AC 100~240V range. You can turn on/off the receiver with transmitter (remote control) from any place within a reliable distance (about 100m); the wireless RF signal can pass through walls, floors and doors.

1_02

Wiring diagram is here. Wire transformer to L&N terminals of “OUT “ terminal. Then wire lamp to the transformer.

circuit

To avoid transformer being always on, you can use transmitter to remote control it. There are three working modes in it. They are toggle, momentary and latched modes. Here, you can choose latched because there are two buttons of transmitter.

Setting control mode Latched: Do not connect Jumper-1 and Jumper-2.

Press button 1: Turn on the transformer, terminal OUT outputs AC power to switch on lamp.

Press button 2: Turn off the transformer, terminal OUT no output to switch off lamp.