How to Control Linear Actuator by Remote Transmitter and Manual Switch

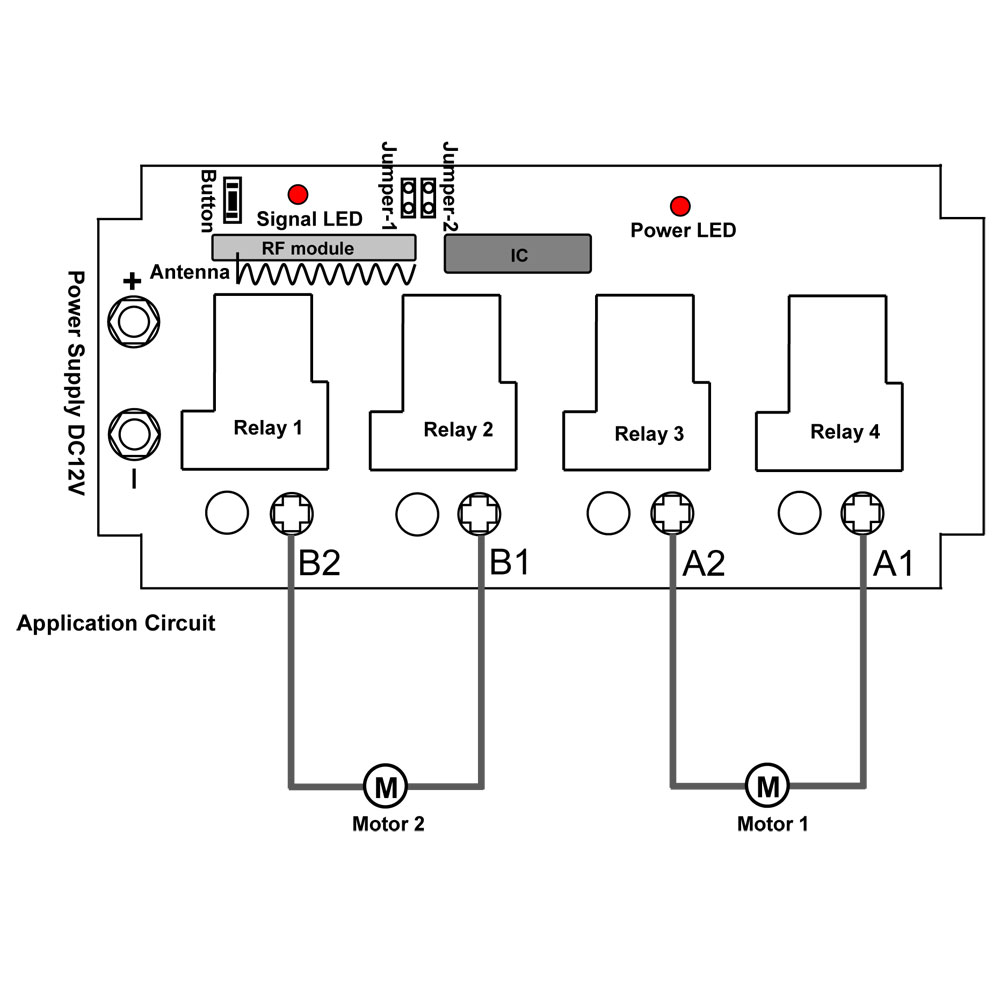
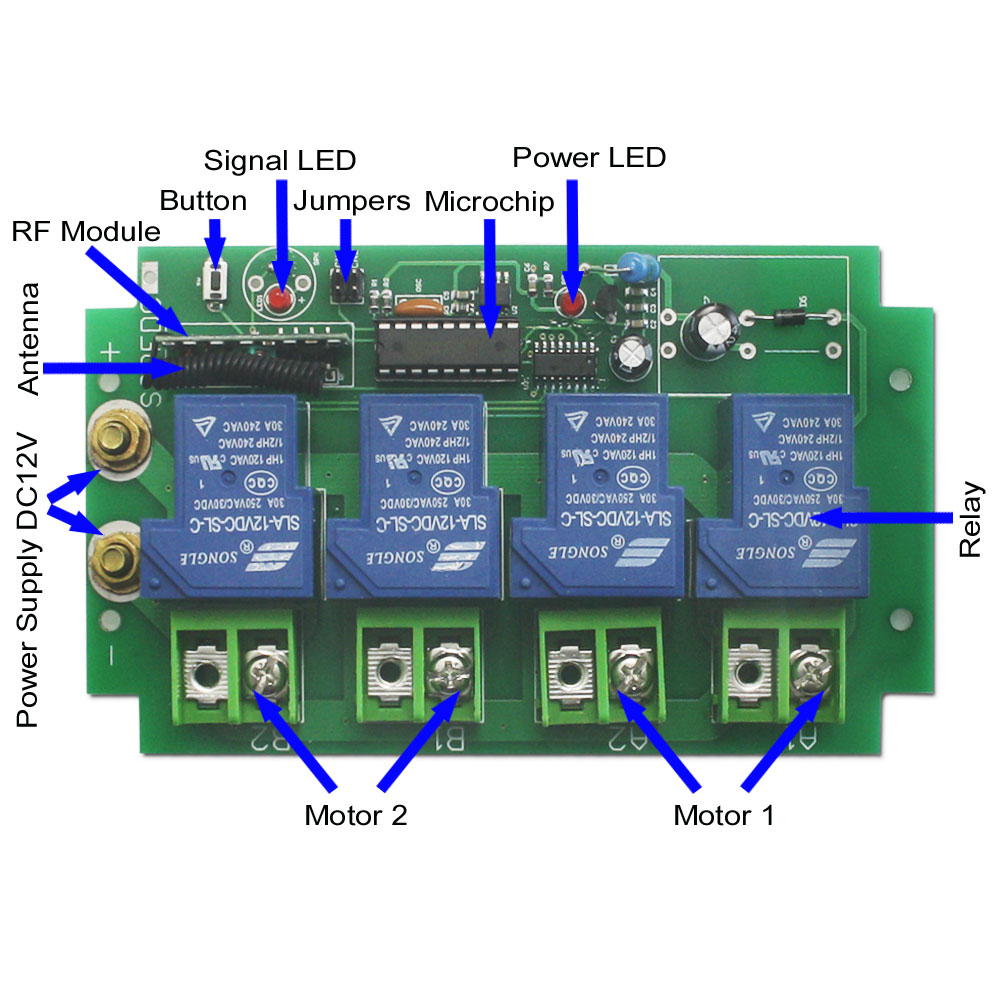
30 amps dc output controller (S1PF-DC12-ANT2+CB-4) is designed for motor controlling. It is compatible with many kinds of motor which is actuated by DC 12V/24V. It is applied to DC motors of rolling blinds / doors, projection screens, awnings, pumps, winches, conveyors or other appliances. We add external extended antenna to the receiver, so we make its transmitting distance reach to 2000m (6000ft) in the open field. The receiver pairs up with a 4-button transmitter and has manual switches on itself. Both transmitter and manual switches can send signal to receiver.

remote controller

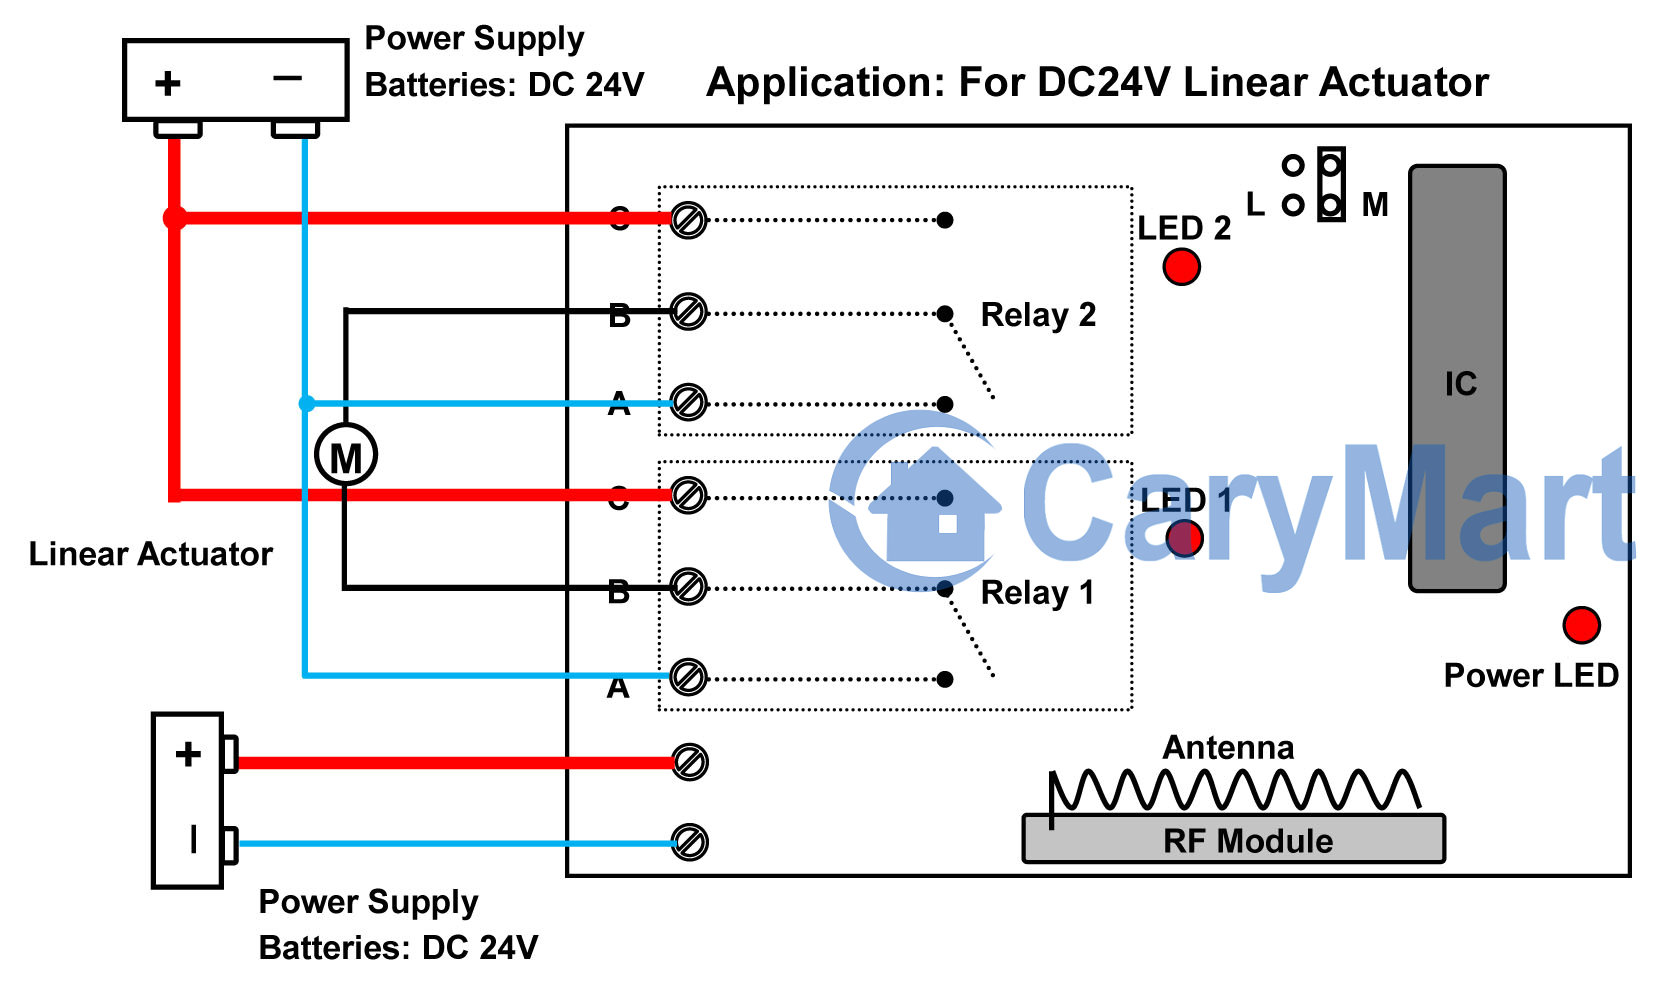
Let’s show you how to control 12V DC linear actuator with transmitter and manual switch.

Here is the material.

1×receiver: S1PF-DC12-ANT2

1×transmitter: CB-4

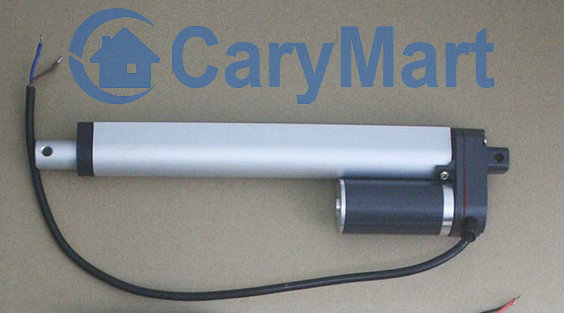
1×12VDC Linear Actuator Motor

Power supply : 12VDC 3A Power Adapter

material

Wiring is simple. You should wire linear actuator to OUTPUT terminal of receiver.

wiring

Setting control mode Latched: Connect Jumper (CN1)

Press button “A”, motor shaft extends

Press button “C”, motor shaft retracts

Press button “B” or ‘D”, motor stops

motor shaft extendmotor shaft retract

motor stop

Manual Switch (Latched mode)

Press “S1″, motor shaft extends

Press “S3″, motor shaft retracts

Press “S2″, motor stops

S1 extendS3 retract

S2 stop

Setting control mode Momentary: Do not connect Jumper

Press and hold button “A”, motor shaft extends; Release button “A”, motor stops

Press and hold button “C”, motor shaft retracts; Release button “C”, motor stops

S1 extendS3 retract

Manual Switch (Momentary mode)

Press and hold button “S1″, motor shaft extends; Release button “S1″, motor stops

Press and hold button “S3″, motor shaft retracts; Release button “S3″, motor stops

motor shaft extendmotor shaft retract

www.ourautomation.com


30A wireless High capacity switch remote control a linear actuator

Question from customer:

Could you tell me the amp load rating for these, as I might have to go with the high capacity switch that can handle a amp load of 30. I am using them to power a linear actuator that has a draw of 20 amps. Maybe the high amp load kit is the correct one?

Answer:

We recommend the high amp load kit to you according to your requirement. It is model: S2PF-DC12/24 & CV-6-2. The receiver (S2PF-DC12/24) is 2 channels and the maximum working current is 30 A/ channel. The transmitter (CV-6-2) has 6 buttons and it can wireless remote control receiver. You can connect the linear actuator with motor to the high capacity switch (receiver) firstly. When you press the buttons of transmitter, the linear actuator with high capacity switch will run through the motor rotates by wireless remote control.

1_01  LAN3A_L


Besides, the high amp kit can control DC motors of rolling blinds / doors, projection screens, awnings, pumps, winches, conveyors or other appliances and mechanicals with voltage DC12V / 24V. You can connect the motor to the high capacity switch (receiver). After you press the buttons in the transmitter, the appliance can be activated by the motor rotates in positive or reversal direction.

Here is the circuit diagram of the high amp load kit. If you would like to remote control one linear actuator, you should connect the motor to output terminal “A1 & A2” or “B1 & B2” of high capacity switch (receiver). Of course you can also connect two motors to it, if you want to remote control two linear actuators at the same time. Then supply power to the high capacity switch (receiver).

1_06

The high amp load kit has two control modes: lathed, momentary. You can set one of two modes as following operation:

Setting control mode Latched: Do not connect Jumper-1 (CN1) or Jumper-2 (CN2)
Press button ▲ on the left: motor 1 rotates in positive direction,
Press button ▼ on the left: motor 1 rotates in reversal direction
Press button ■ on the left: motor 1 stops
Press button ▲ on the right: motor 2 rotates in positive direction
Press button ▼ on the right: motor 2 rotates in reversal direction
Press button ■ on the right: motor 2 stops

Setting control mode Momentary: Only connect Jumper-1 (CN1)
Press and hold button ▲ on the left: motor 1 rotates in positive direction
Release button ▲ on the left: motor 1 stops
Press and hold button▼ on the left: motor 1 rotates in reversal direction
Release button ▼ on the left: motor 1 stops
Press and hold button ▲ on the right: motor 2 rotates in positive direction
Release button▲ on the right: motor 2 stops
Press and hold button▼ on the right: motor 2 rotates in reversal direction
Release button ▼ on the right: motor 2 stops

1_03

The high amp load kit can be used to wireless remote control the linear actuator up or down. If you want to know more something about the high capacity switch, you can enter into our website and search the product as following:


Model: 0020481 (S2PF-DC12/24 & CV-6-2)


Website:

http://www.carymart.com/


http://www.rfcontrolsystem.com/index.php?main_page=product_info&cPath=166_411&products_id=1310

How to Remote Control Linear Motion Actuator Run Forward and Backward

Question from customer:

I have 24V Linear Motion Actuator which moves 2 ways (OUT and IN). Also I have 24V power Supply.

I would like to connect the remote control, and be able to open and close the actuator. Ideally, I want to press the button until actuator extends fully, and press another button to retract fully.

Linear Actuator

Answer:

We recommend this 2 channel wireless remote control momentary on off switch which is widely applied to lights, motors, fans, electrically operated doors / locks / windows / blinds, etc. One relay as an ON/OFF switch can turn on or off electric gadget. If you want to remote control  bidirectional motion, you may choose 2 channel remote (two relays). Your linear motion actuator can run forward and backward, so this remote is very available for you. It provides linear motion actuator with 10A. It is enough for linear motion actuator. With 2-button transmitter, its working distance reaches about 100m which can make your control range much wider, getting rid of narrow space constraint.

1

The wiring of linear motion actuator is a little sophisticated. See the following picture.

motor circuit

Initial state: A, B = Normally Closed; B, C = Normally Open.

So wire linear motion actuator to B terminals of two relays. Wire “C” terminals of two relays together to positive electrode of 24 batteries. Wire “A” terminals of two relays together to negative electrode of 24 batteries. And supply additional power to the receiver. It can avoid generating interfere between receiver and linear motion actuator.

Momentary mode is the only working mode in this remote. So press and hold button 1, linear motion actuator extends slowly, if you release button 1, it stops moving. Press and hold button 2, linear motion actuator retracts slowly, if you release button 2, it stops moving.

30amp High Power Remote Control 4 Linear Motors

Question from customer:

I have this truck project. I’m using 4 linear actuators to lower and raise a back cover of truck I need a controller that can move 2 linear actuators at a time.

linear actuator

Answer:

Our suggestion is that you can use our 2 channel high power motor controller (S2PF-DC12+CV-6-2).

With high power of 30A, so that you can control DC motors of rolling blinds, doors, projection screens, awnings, pumps, winches, conveyors or other appliances and mechanicals with voltage DC12V / 24V. You can rotate the motor in positive or reversal direction with the transmitter (remote control) from any place within a reliable distance; the wireless signal can pass through walls, floors and doors.

1_01

You want to remote move every 2 linear actuators simultaneously, you can wire them in parallel at Output A1&A2 and B1&B2 respectively. Connect terminals “+” and “-” to power supply DC12V / 24V; connect terminals “A1″ and “A2″ to motor 1&2; connect terminals “B1″ and “B2″ to motor 3&4.

circuit

Operation:

Setting control mode Latched: Do not connect Jumper-1 (CN1) or Jumper-2 (CN2)

Press button ▲ on the left: motor 1&2 rotate in up direction at same time.

Press button ▼ on the left: motor 1&2 rotate in down direction at same time.

Press button ■ on the left: motor 1&2 stop

Press button ▲ on the right: motor 3&4 rotate in up direction at same time.

Press button ▼ on the right: motor 3&4 rotate in down direction at same time.

Press button ■ on the right: motor 3&4 stop

Setting control mode Momentary: Only connect Jumper-1 (CN1)

Press and hold button ▲ on the left: motor 1&2 rotate in up direction at same time.

Release button ▲ on the left: motor 1&2 stop

Press and hold button▼ on the left: motor 1&2 rotate in down direction at same time.

Release button ▼ on the left: motor 1&2 stop

Press and hold button ▲ on the right: motor 3&4 rotate in up direction at same time.

Release button▲ on the right: motor 3&4 stop

Press and hold button▼ on the right: motor3&4 rotate in down direction at same time.

Release button ▼ on the right: motor3&4 stop

Remote Control 4 Linear Actuators Up and Down Simultaneously

Question from customer:

I have this car project. I’m using 4 linear actuators to lower and raise a front spoiler on the bumper. I need a controller that can move all 4 simultaneously.

remote control linear actuator

Answer:

Our suggestion is that you can use our one channel high power motor controller (S1PF-DC12+CV-4-2).

remote controller

With high power of 30A, so that you can control DC motors of rolling blinds, doors, projection screens, awnings, pumps, winches, conveyors or other appliances and mechanicals with voltage DC12V / 24V. You can rotate the motor in positive or reversal direction with the transmitter (remote control) from any place within a reliable distance; the wireless signal can pass through walls, floors and doors. You want to remote move 4 linear actuators simultaneously, you can wire them in parallel.

circuit

Operation:

•Connect power supply DC12V / 24V to terminal “INPUT”; connect linear actuators to terminal “OUTPUT”.

•Setting control mode Latched: Do not connect Jumper-1 (CN1) or Jumper-2 (CN2)

Press button ▲: 4 linear actuators rotate in up direction at same time.

Press button ■: linear actuators stop

Press button ▼: 4 linear actuators rotate in down direction simultaneously.

Press button ■: linear actuators stop

•Setting control mode Momentary: Only connect Jumper-1 (CN1)

Press and hold button ▲: 4 linear actuators rotate in up direction at same time.

Release button: linear actuators stop

Press and hold button ▼: 4 linear actuators rotate in down direction simultaneously.

Release button: linear actuators stop