DC Motor Rotation Automation

We have set and saved the following data previously:

15:10  Motor rotates in positive direction. (The first operation), that is (W:3  C:1  R:+ WORK).

15:11  Motor stops. (The second operation), that is(W:3  C:2  R:0 WORK).

15:12  Motor rotates in reverse direction.(The third operation), that is (W:3  C:3  R:- WORK).

15:13  Motor stops. (The fourth operation), that is(W:3  C:4  R:0 WORK).

Everything is done. DC motor is ready to work when time is up.


When the real time is 15:10, motor rotates in positive direction. At the bottom of the tube screen, it displays the next operation at this time.

W:3 (Wednesday)  C:2 (The second operation)  R:0(stop) WORK

When the electronic clock reads 15:11, motor will stop.

positive-rotation

When the real time is 15:11, motor stops. At the bottom of the tube screen, it displays the next operation at this time.

W:3 (Wednesday)  C:3 (The third operation)  R:- (reverse direction) WORK

When the electronic clock reads 15:12, motor will rotate in reverse direction.

stop 1

When the real time is 15:12, motor rotates in positive direction. At the bottom of the screen, it displays the next operation at this time.

W:3 (Wednesday)  C:4 (The fourth operation)  R:0(stop) WORK

When the electronic clock reads 15:13, motor will stop.

reverse-rotation

When the real time is 15:13, motor stops. All operations are finished successfully.

stop 2

Vdieo:

Motor Automation Time Setting

We’d like to do time setting of motor rotation and stop automatically. We still use button S1~S3 to set or adjust time.

Suppose that the real time is February, 19th 2014, 15:00, Wednesday.

We will set the following data:

15:10, Wednesday, motor rotates in positive direction

15:11, Wednesday, motor stops

15:12, Wednesday, motor rotates in reverse direction

15:13 Wednesday, motor stops

Procedure:

Press and hold S1 (about 2 seconds) to enter into automatic working setting.

Press S1 again to set “Week (W)”, press S2/S3 to set W:3;

Press S1 again to set “Working times (C)”, press S2/S3 to set C:1(The first working time), C:2 (The second working time)…;

Press S1 again to set “Motor working status (R)”, press S2/S3 to set R+ /- / 0 (+ : motor positive rotation, -: motor reverse rotation, 0: motor ‘s stop)

Press S1 again to set “Motor working time”, press S2/S3 to set time of motor working status (e.g.15:10)

Press and hold S1 about 2 seconds to finish this setting and saving data.

(When you press S2/S3 to adjust data, the corresponding figure will flicker)


Finishing and saving the first setting data(15:10, Wed, Positive rotation) :

The screen reads “2014-02-19  15:02  W:3  C:1  R:+ Work”

(15:02 is the real time; W:3 is Wednesday;  C:1 is the first working time; R:+ is positive rotation)

positive rotation

Finishing and saving the second setting data(15:11, Wed, Stop):

The screen reads “2014-02-19  15:02  W:3  C:2  R:0 Work”

(15:02 is the real time; W:3 is Wednesday;  C:2 is the second working time; R:0 is motor’s  stop)

stop 1

Finishing and saving the third setting data(15:12, Wed, Reverse rotation):

The screen reads “2014-02-19  15:03  W:3  C:3  R:- Work”

(15:03 is the real time; W:3 is Wednesday;  C:3 is the third working time; R:- is reverse rotation)

reverse rotation

Finishing and saving the fourth setting data(15:13, Wed, Stop):

The screen reads “2014-02-19  15:04  W:3  C:4  R:0 Work”

(15:04 is the real time; W:3 is Wednesday;  C:4 is the fourth working time; R:0 is motor’s stop)

stop 2

Video:

Manual Switch and Transmitter of Digital Tube Circuit with Timed Controlling Function Control Motor

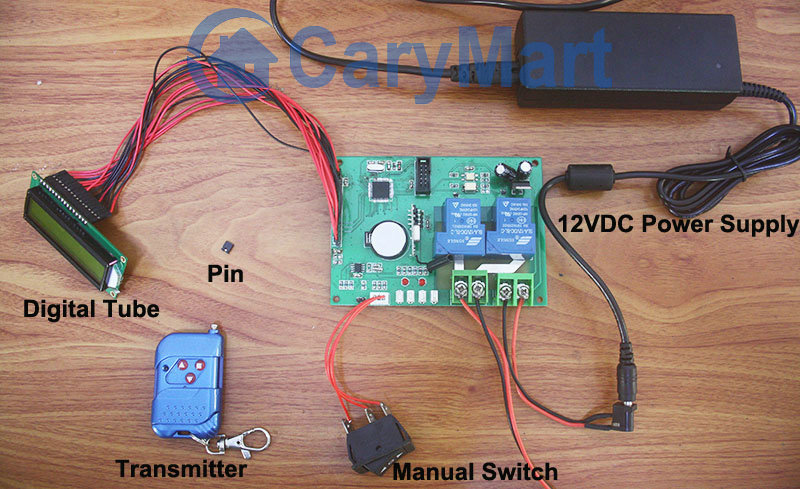
Digital tube circuit controller is 12VDC power activated. And motor can be wired to output terminals. The receiver and controlled device can share the same power supply. You can use manual switch or transmitter to remote control motor. In addition, with timing control function, you can preset designated time and when time is up, motor will rotate or stop automatically.

digital tube circuit board

Here we talk about using the manual switch and transmitter to control motor.

Manual switch controlling:

Control positive, reverse rotation and stop of motor.

Working method: Move to “positive rotation” position, motor rotates in positive direction; move to “Stop” position, motor stops; move to “reverse rotation” position, motor rotates in reverse direction.

Remote Control with transmitter:

Insert pin to jumper: Press and hold the “▲” button, motor rotate in positive rotation; release the “▲” button, motor stops. Press and hold the “▼” button, motor rotates in reverse direction; release the “▼” button, motor stops.

Do not insert pin to jumper: Press the “▲” button, motor rotate in positive rotation; press the “■” button, motor stops. Press the “▼” button, motor rotates in reverse direction; press the “■” button, motor stops.

Here two videos for your reference.

Manual switch controlling:

Remote Control with transmitter:

Code Learning and Deleting

This is the digital display tube circuit board with fixed time controlling function. There are 12VDC power input and output terminals, manual switch, digital tube for time and jumper.

digital tube circuit board

There are also several buttons and terminals at circuit board. S1 (SET), S2 (+), S3(-), S4(LEARNING BUTTON) from right to left.

setting button

There are 3 controlling methods in it. They are manual switch control function, remote control function and fixed time controlling function. First of all, we will introduce the code learning and manual switch control function.

Code Learning:

1) Press button S4; signal LED on the controller keeps shining. The controller enters into status of LEARNING.

2) Press any one button on remote control. If signal LED flashes quickly 5 times and turns off, it means learning is successful.

3) When controller is in the status of LEARNING, press again button S4, signal LED turns off, learning process will be discontinued.

4) The controller can learn several remote controls with different codes.

We can test the learning situation, press “▲”, motor rotates in positive direction. Press “■”, stop the motor.

Code Deleting:

If you don’t want the controller to work with the remote control when you have learned remote control to the controller, you can delete all codes of remote controls, which are stored in the controller.

Operation: Press and hold S4 until signal LED flashes slowly; release the button, LED keeps slow flash. We can test the code deleting situation, press any buttons of transmitter, there is no response from motor. That means all stored codes have been deleted successfully.

Here is code learning and deleting videos for your reference.