High amp Load Receiver and Wall-mounted Rocker Switch for Pump

Overview:

I want to remote control my submersible pump which draws water every day. It is 30amps and runs 220V power supply. Can you get the single channel remote control kit 30a ac 110V/220v with a wall mount remote control switch?

Solution:

We suggest that you can use 110V/220V power output high amp load receiver (S1PX-AC220) & wall mounted rocker switch. The receiver circuit is designed for high capacity device (30amps). It is 110V/220V power output, you don’t have to add additional power supply for your submersible pump which is to be controlled. You can only wire submersible pump to receiver “OUTPUT” terminals. When power for receiver is on, submersible pump will work. And when high amp load receiver works the wall mounted rocker switch, their working distance can reach 500m (theoretical data in the open field). You can use screws to install rocker switch to the wall.

remote-control-kit

Wire submersible pump to the L&N contact terminal of receiver, and power receiver on. Install rocker switch on the wall.

motor-wiring-diagramt

Press the rocker switch, submersible pump start to draw water.

Press the rocker switch again, submersible pump stop drawing water.

1000m Range Multi-mode Beeper& Vibrator Remote Control Kit

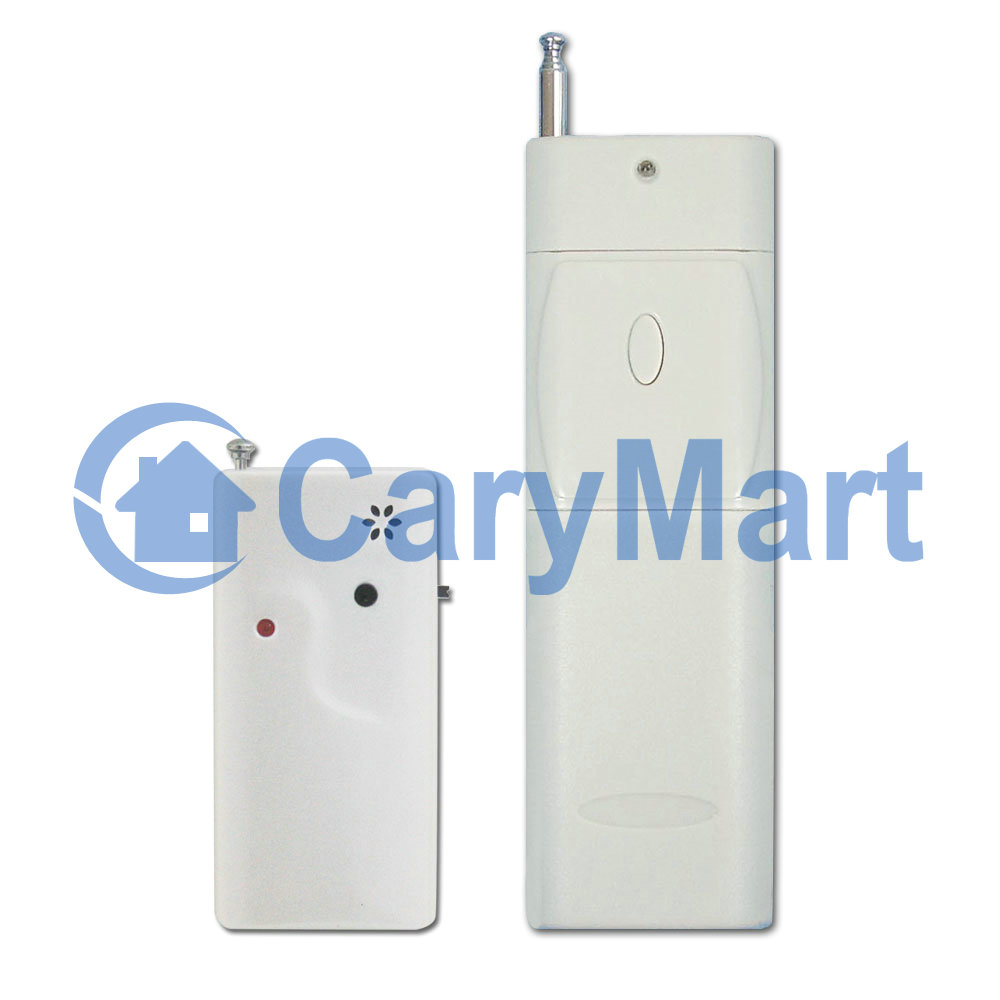
Beeper is an audio signaling device, which is used in alarm devices, timers or other devices typically. A customer is interested in our remote-controlled beeper& remote transmitter kit. He needs 12 beepers and 12 transmitters with 1000m working distance but He wants to be able to register one transmitter to two beepers and two transmitters to one receiver. It is possible to pair up one transmitter to two beepers or two transmitters to one receiver.

1    1_03

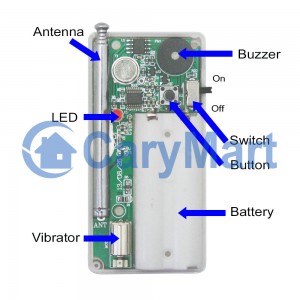
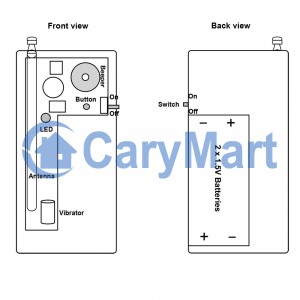
This beeper kit has vibration mode and vibration mode &beeper mode other than beeper mode. The receiver works with 1000m-range transmitter. Its working distance can reach 1000m in the open field. You can control the receiver with transmitter (remote control) from any place within a reliable distance, the wireless signal can pass through walls, floors and doors.

1_05

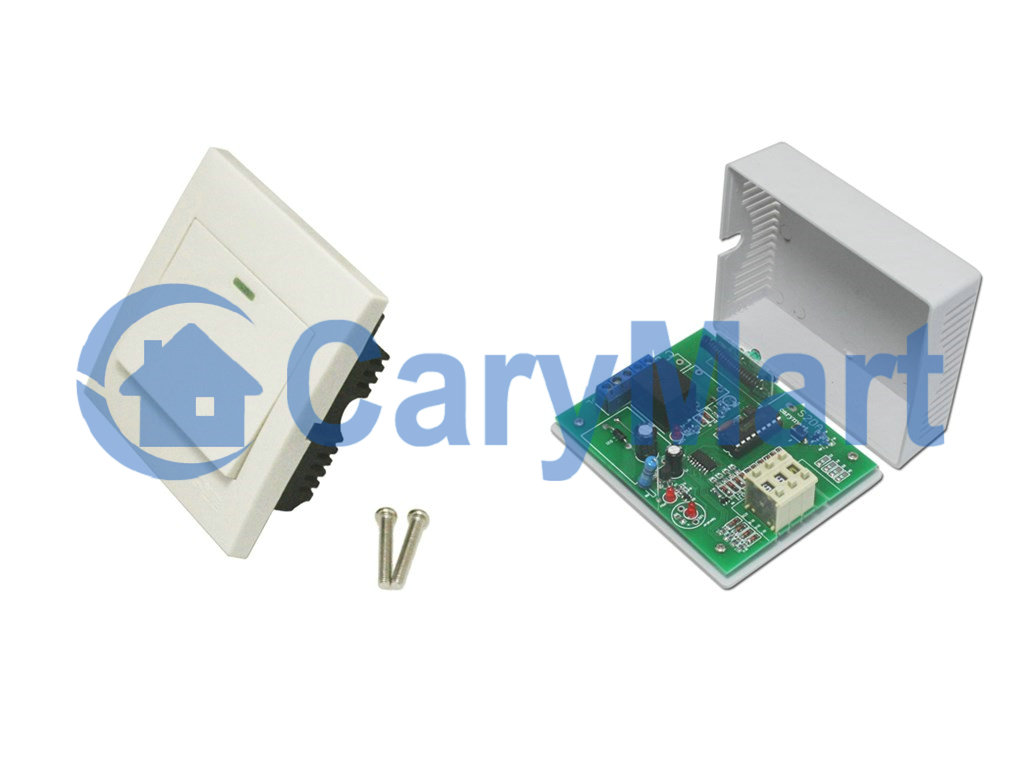
To realize one transmitter controlling two beepers or two transmitters controlling one receiver, first of all, you should use receiver to learn codes from transmitter.

One transmitter controlling two beepers:

Press and hold the learning button of the first receiver for about 5 seconds, then release the button when LED light is on, the receiver is in the status of Learning.

Press button of remote control within 10 seconds, if LED light flashes twice then off, it means Learning is successful.

If LED light is off after 10 seconds, it means Learning is failed and the receiver quits the status of Learning.

Follow steps above to make the second receiver learn code from the transmitter.

Operation 1:

Vibration mode: Press the button of transmitter, two receivers vibrate for 5 seconds.

Beep mode: Press the button of transmitter, two receivers beep for 5 seconds.

Vibration & Beep mode: Press the button of transmitter, two receivers vibrate and beep together for 5 seconds.

Two transmitter controlling one receiver:

Press and hold the learning button of the receiver for about 5 seconds, then release the button when LED light is on, the receiver is in the status of Learning.

Press button of the first transmitter within 10 seconds, if LED light flashes twice then off, it means Learning is successful.

If LED light is off after 10 seconds, it means Learning is failed and the receiver quits the status of Learning.

Follow steps above to make the receiver learn the second transmitter.

The receiver can learn several remote controls of different codes.

Operation 2:

Vibration mode: Press the button of transmitter 1, the receiver vibrates for 5 seconds; Press the button of transmitter 2 the receiver vibrates for 5 seconds.

Beep mode: Press the button of transmitter 1, the receiver beeps for 5 seconds; Press the button of transmitter 2, the receiver beeps for 5 seconds.

Vibration & Beep mode: Press the button of transmitter 1, the receiver vibrates and beeps together for 5 seconds; Press the button of transmitter 2, the receiver vibrates and beeps together for 5 seconds.

Changing modes: As long as press the button of receiver, you can switch those three working modes optionally. Such as press the button of receiver, switch to beep mode from vibration mode; press the button of transmitter again, switch to vibration & beep mode; press the button of transmitter again, switch to vibration mode.

2-Gang Wireless Rocker Switch and Time Delay Receiver Control Two DC Lights

For conventional light switch, we have to drill holes in the wall and wire between switch and light fixture. However, we usually want to make thing easily to handle and get fed up with the amount of routing and drilling. If we run a regular circuit, we must drill holes to get each wire to the switch location leading to increasing the electrical workload. So we usually seek easy and convenient method for light fixture. Wireless switch is your better choice. Our 2-gang wireless rocker switch is suitable as a light switch that controls a light or home appliance to turn itself off or on, instead of complicated wiring. With stick-on back, we can simply affix the wireless rocker switch to any place we want.

1       1_03

With the use of radio transmission, wireless remote controlling light can be realized. Here we want to try something new in comparison with using ordinary RF receiver. We use adjustable time delayed receiver to work with this wireless rocker switch.

1_05

At first, we should pair up wireless rocker switch and adjustable time delay receiver. Then, we install the rocker switch to wall after uncovering the cover of double-adhesive tape. Two DC lights are typically wired into receiver. Initial state: A, B= Normally Closed; B, C =Normally open. So DC lamp should be wired to B, C terminals. Supply power to DC lamp and receiver respectively.

1_09

Press buttons of “+” and “-” on two timer of two relays, adjust delays’ time from 0 second to 99 hours. “H” is Hour, “M” is Minute, and “S” is Second.

For example, supposed we set “M 0 1”, of relay 1, it means the delay time is 1 minute. We set “M 0 2” of relay 2, it means the delay time is 1 minutes.

Press button on the rocker switch on the left, turn on the light 1. After delay time, light 1 will turn off by itself.

Press button on the rocker switch on the right, turn on the light 2. After delay time, light 2 will turn off by itself.

If we want to turn off any lights immediately, press button on either side of rocker switch again, corresponding light turns off, no need to wait for delay time.

Remote light switches use the transmission of a radio signal to the receiving device to make light fixture off and on and eliminated the wire from light to switch location. This is very useful in remodeling of your house where new wiring can be rather difficult. Rather than drill holes on the wall to get access wiring, wireless switch can be used in that situations to make your house remodeling fast and simple.

Wireless Switch and Adjustable Time Delay Receiver for DC Light

We can use wall mounted wireless rocker switch and time delay adjustable receiver to control DC lamp.

The wireless rocker switch belongs to remote control calling system, which is the hi-tech electronic product which is integrated wireless communication and computer technology. It is widely applied to restaurants, coffee shops, karaoke rooms, discos, sauna rooms, beer houses, pubs, night clubs, bowling alleys, golf courses, video halls, hotels, hospitals, schools, chain stores ,shops… Time delay adjustable receiver has the range of time adjusting 0 second~99 hours. With normally open& closed terminal contact, we can wire DC or AC device to it. We are going to let them work together to build a new remote control system.

rocker switch& receiver

At first, we should pair up wireless rocker switch and adjustable time delay receiver. Then, we install the rocker switch to wall with screw. Next, we wire DC lamp to receiver. Initial state: A, B= Normally Closed; B, C =Normally open. So DC lamp should be wired to B, C terminals. Supply power to DC lamp and receiver respectively.

1_09

Press buttons of “+” and “-” on the timer, adjust delay time from 0 second to 99 hours. “H” is Hour, “M” is Minute, and “S” is Second.

For example, supposed we set “M 0 1”, it means the delay time is 1 minute.

Press button on the rocker switch, turn on the lamp. After delay time, lamp will turn off by itself. If we want to turn off lamp immediately, press button on the rocker switch again, lamp turns off, no need to wait for delay time.

Tri-mode Vibrator&Beeper Kit Works with Wireless Remote Button

Sometimes, we need alerting devices or reminders to remind us of doing something. We can use audible signaling device like beeper, buzzer. We can use vibrating alerts when a user cannot hear the ring tone (a noisy environment or through hearing loss) or wants a more careful notification. Now, our 433MHz tri-mode vibrator& beeper kit is made up of built-in vibrator and buzzer which can pair our 1000m 999-channel numeric keypad wireless transmitter. When they are paired up, wireless button can remote control this vibrator& beeper kit.

calling-button&vibrator_1

The wireless transmitter can send 999 different wireless RF signals by pressing a number from button 1 to 999.


Pairing up wireless button and Vibrator& beeper kit

Note 1: Here we only pair button 1 on the transmitter to vibrator& beeper kit just for an example.

1) Press and hold the learning button of the receiver for about 5 seconds, then release the button when LED light is on, the receiver is in the status of Learning. 2) Press button 1 of transmitter within 10 seconds, if LED light of kit flickers twice then off, it means Learning is successful. At the same time, the LED light of transmitter will flicker too. If LED light is off after 10 seconds, it means Learning is failed and the receiver quits the status of Learning. 3) The receiver can learn several remote controls of different codes

1 transmitter (with 999 channels, one channel for one vibrator& beeper kit) can pair up 999 vibrator& beeper kit.

Note 2:

We have learned remote control to the receiver. If you don’t want the receiver to work with the remote control, you can delete all stored codes: Delete all stored codes: Press and hold the button of the vibrator& beeper kit for about 5 seconds until LED light turns on and go on holding till LED light turns off, then release the button, all stored codes have been deleted successfully. At this time, the transmitter cannot control the receiver.

Note 3:

If you want to delete all stored codes, you should first switch off the receiver and switch on again, then you can go on deleting codes.


Operation:

•Vibration mode: Press the button 1 of transmitter, then press the “Send” button to transmit this wireless signal. The receiver kit vibrates for 5 seconds.

•Beep mode: Press the button 1 of transmitter, then press the “Send” button to transmit this wireless signal. The receiver kit beeps for 5 seconds.

•Vibration & Beep mode: Press the button 1 of transmitter, then press the “Send” button to transmit this wireless signal. The receiver kit vibrates and beeps together for 5 seconds.

•Changing modes: As long as press the button of receiver, you can switch those three working modes optionally. Such as press the button of receiver, switch to beep mode from vibration mode; press the button of transmitter again, switch to vibration & beep mode; press the button of transmitter again, switch to vibration mode.

Delete wrong digit

•If you press wrong digit before pressing the “Send” button, you can press “Delete” button to delete all numbers you pressed previously.