Customized Time Delay 6V Remote Controller for Lamp

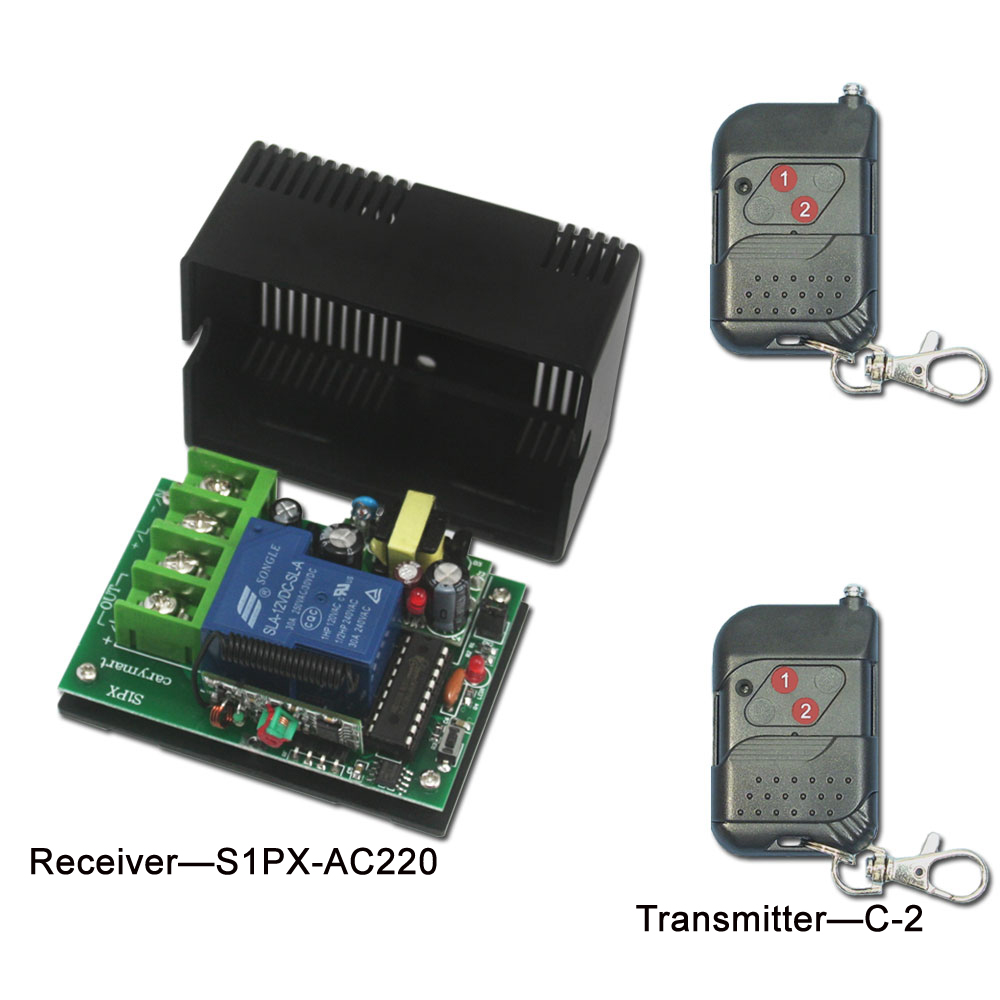
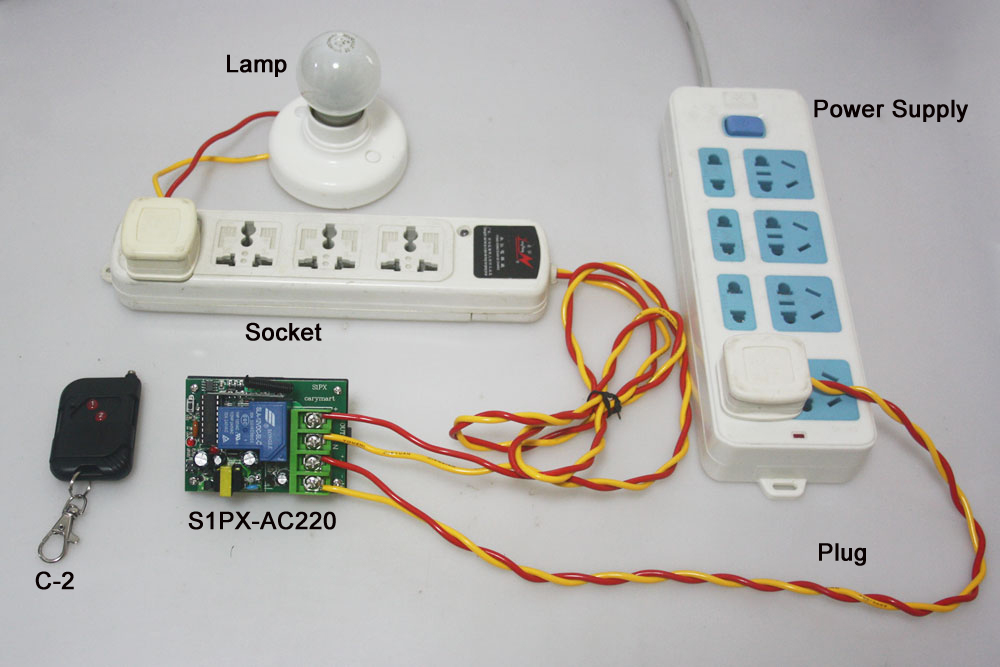
This 1 channel dc RF remote control switch features in controlling relay off time delay. Delay time can be customized according to actual requirement. It is widely applied to control lights, motors, fans, electrically operated doors / locks / windows / blinds or other electrical devices. It is activated in 6V power supply. You need provide us with the delay time you want when ordering. E.g. delay time: 20 seconds or 1 hour or 20 minutes… The delay time is not adjustable freely. Its working current is 10ampere and working distance is 100m (300ft).

1

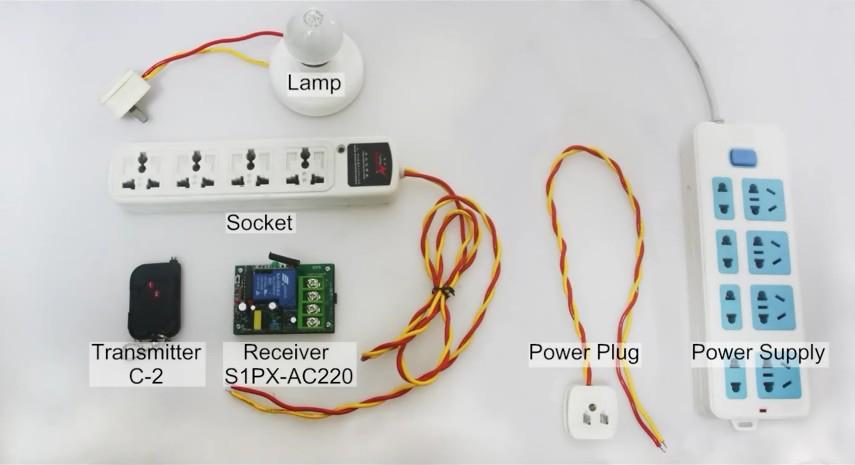
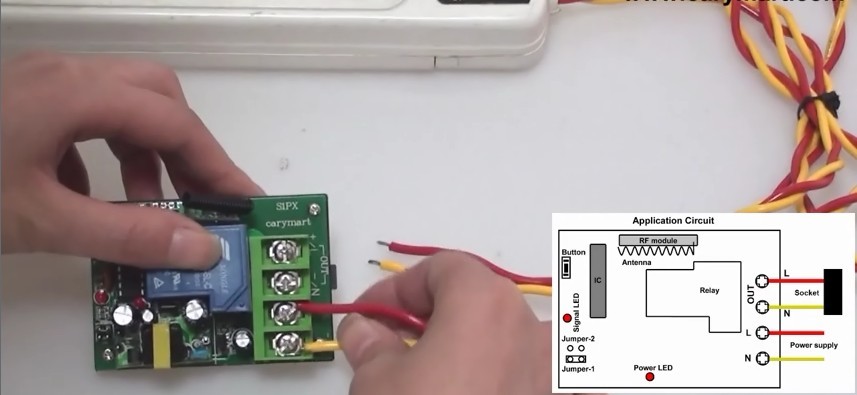
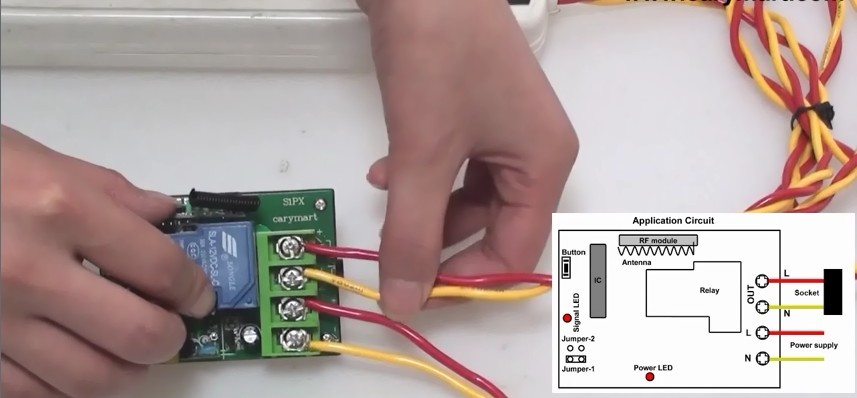
It has normally open and closed contact. It controls various lights, fans or motors with voltage AC110~240V or DC0~28V. Here is the alternate current device wiring diagram and the wiring diagram of direct current device which not share the same power supply with receiver.

1_08

Of course, if you want to remote control direct current device which shares the same power supply with receiver, you need to do some different wiring from above wiring. Suppose that you want to remote control 6V lamp. So you don’t have to supply additional power for led lamp because led lamp will get power from powered receiver as long as you wire lamp to the receiver.

Here is the wiring procedure of 6V lamp which shares the same battery with receiver. The red wire from the lamp is connected to the C terminal of the receiver and black wire from the lamp is connected to the negative electrode of the power supply. The positive wire of the supply power is connected to B terminal and positive electrode of the receiver. The negative electrode of the power supply of power supply and receiver are connected together.

circuit

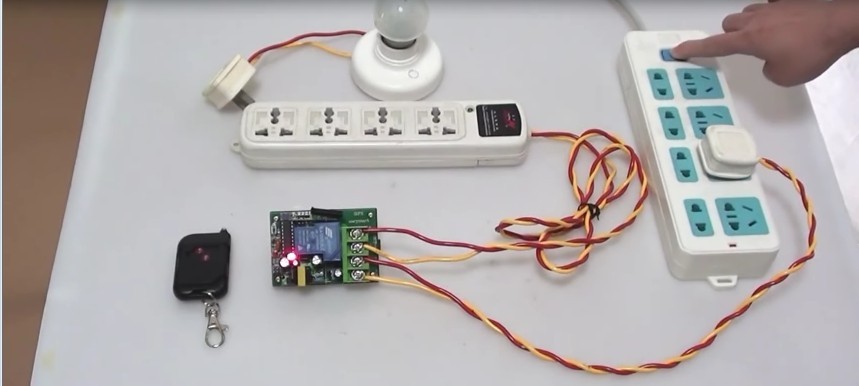
We set its delay time 20seconds.

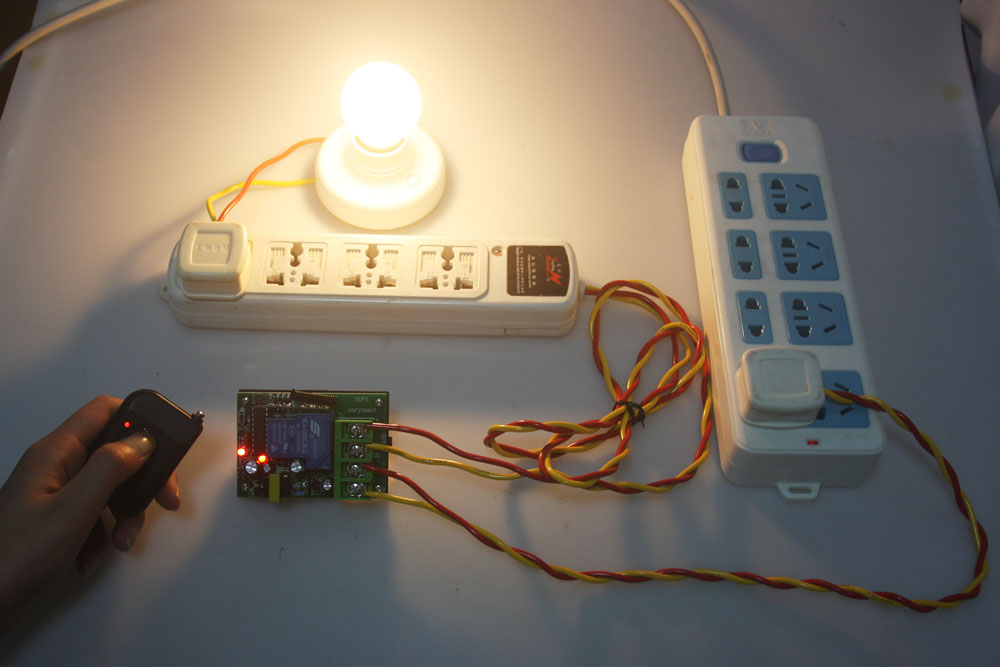
Press button 1: Turn on the lamp. After 20seconds, turn off the lamp by itself.

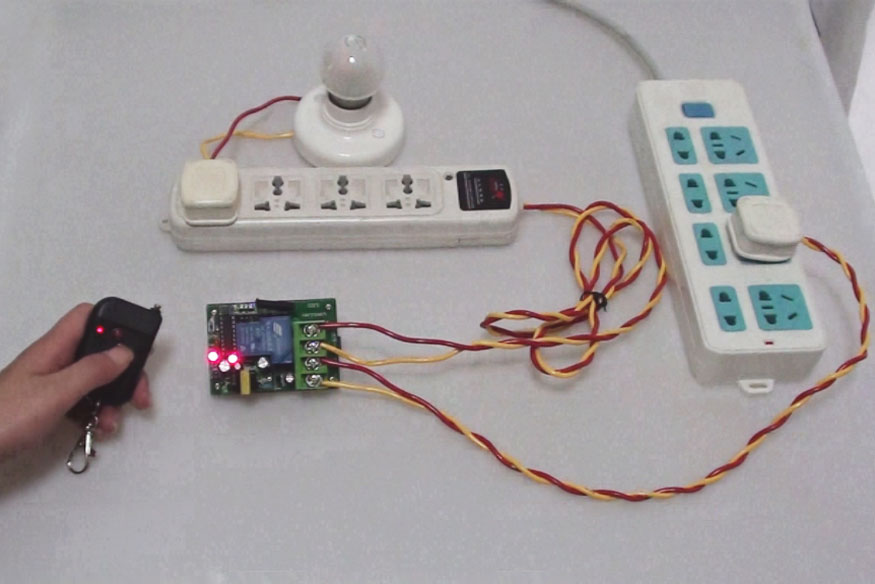
During the delay time, press button 2: Turn off the lamp straightway.

Normally Open and Closed Remote Controller for Contactor

Someone would like a remote control to switch on and off his lamp via controlling a contactor. He drew a picture to illustrate his idea. Maybe it is not so convenient to him to remote control lamp directly, so he choose to control his lamp via a contactor.

untitled

We recommend him a 1 channel AC remote switch with memory function (S1MU-AC220+C-2). This 1 channel ac rf memory remote controller operates in toggle, momentary and latched control mode (set the mode as you like freely). With function of memory, if the power is cut off, the relay will return automatically to the previous status after the power is restored. It is great for hard to reach lights or other electrical devices, remote distance up to 100m (theoretically). It is applied to control lights, motors, fans, electrically operated doors / locks / windows / blinds / cars or other appliances with voltage AC 110~240V or DC 0~28V.

1_02

According his requirement, we have this following diagram. Initial state: A, B = Normally Closed; B, C = Normally Open. Wire contactor to normally open contact B&C terminals. And Wire a lamp to contactor and install a switch for lamp (See the original picture).

circuit

There are 3 working mode of remote control. They are toggle, momentary and latched modes. We suggest that he should set latched mode because this remote works with a 2-button transmitter.

Setting control mode Latched: Do not connect Jumper-1 and Jumper-2.

Control mode Latched: Press -> On, another relay Off; Press another button -> Off.

Press button 1: Turn on the contactor to turn on lamp (connect B and C, disconnect A and B)

Press button 2: Turn off the contactor to turn off lamp(disconnect B and C, connect A and B)

Latched Mode Remote Control Switch for Lamp Controlling

When you want to remote control one more AC devices, you may think about 2 channel remote receiver. This kind of Latching 2 channel remote switch (S2L-AC110~240V + C-1) may be suitable for you. It is activated by AC110V~240V power supply, so being controlled devices will get power from powered receiver. The maximum current output is 3 ampere. The Coding type of receiver is learning code. You can remote control any electric devices within 100M (No obstacles).

1

Look at the following wiring diagram. We try to introduce 2 lamps controlling of this kind. First, we connect the neutral wire to the terminal “1”, and the live wire to the terminal “2”. Second, we connect the lamp 1 to the terminal “5” and the neutral wire. Third, we continue to connect the lamp 2 to the terminal “4” and the neutral wire.

1_06

Latching mode is the only working mode of this remote. So we can do the following operation. 1) Press button C: Turn on the lamp 1, turn off the lamp 2.

2) Press button B: Turn on the lamp 2, turn off the lamp 1.

3) Press button A: Turn off the lamp 1 and the lamp 2.

You can remote control any AC electric appliances other than lamps. It is very convenient to you because you don’t have to supply any power to controlled appliances.

6000ft AC Direct Output Remote Switch for Electric Appliance

Question from customer:

I want to turn an appliance off and on in a room in my house 120ft from the room with the transmitter. Does the appliance plug into the receiver and the receiver plug into an outlet?

Answer:

We recommend 6000ft long range ac direct output remote controller (S1X-AC220-ANT2 & CB-2). The remarkable feature of this remote controller is that 220V power direct output, that is to say, appliance plugs into receiver directly and gets 220V power from powered receiver( receiver is plugged into an outlet.) The maximum current of its relay is 10 ampere which is suitable for some appliances. The working distance is longer than any other remote, which is about 6000ft in the open field. 6000ft is long enough for your remote controlling.

1_01

At first, it is the wiring. Look at the following wiring diagram. For instance, we remote control a lamp. We just need to wire lamp to “L&N” terminals of “OUT”. That is very easy. And supply ac 220V to receiver. Then lamp can get power from powered receiver.

1_06

And this receiver works with two-button long range transmitter. There are three working modes in it. They are Toggle, Momentary, and Latched modes. If there is only a device, we recommend setting latched mode.

Setting control mode Latched: Do not connect Jumper-1 and Jumper-2.

Press button 1: turn on the lamp.

Press button 2: Turn off the lamp.

How to change an ordinary portable socket to an RF remote control portable socket

Long time ago, infrared remote controlling system has appeared and now it is still widely used in our daily life. For instance, using infrared remote controller to control TV set, air-conditioner, light, shutter, door and so on.

Now, I believe that you may hear something about remote control socket which uses the infrared to send signal to turn on or off the socket so that it can supply or cut off power to devices. That is an innovative idea of the use of infrared. But infrared remote controlling has its defects. The major defect is a point and click operation system. You have to have the remote control in the line of site of devices themselves. There is no exception with infrared remote control socket. You may still have to find the infrared received terminal on the socket and aim at it with transmitter like you use any of infrared control gadgets. If you go to another place which is far away from the controlled appliance, you cannot do that because of poor signal blocked by door, wall or something else.

But the rf remote control system can help you to solve this problem that it can penetrate non-transparent objects and fixed barriers to transmit signal. That is to say, it can transmit signal through door, wall or in a long range. We may feel free and convenient when using this system.

How to change an ordinary portable socket to an RF remote control portable socket on earth? We can offer a little control gadget to refit your ordinary socket.

First, we need the following gadget.

picture1


Then, we should prepare a socket, a plug and a lamp and power supply other than the transmitter and receiver.

picture2

The wiring processing is very simple.

Step 1, we connect the plug wires to the input terminal of the receiver.

picture3

Step 2, the wires from the socket should be connected to the output terminal of the receiver.

picture 4

Step 3, we insert the plug to power supply and switch, the power LED light in the receiver shine at once.

picture5

Step 4, the lamp’s plug is inserted to the socket.

picture6

The wiring processing finished.

picture7

Step 5, press button 1, the lamp turns on.

picture 8

Step 6, press button 2, the lamp turns off.

picture 9


That is really a simple way to change an ordinary socket to an RF remote control socket. If you have this kind of socket, it is so convenient to you. You can switch on or off any devices plugged into the socket. An rf remote control socket is so easy to make as long as you use our rf remote control products.

Online shop: www.carymart.com/